How to Re-Caulk Windows: A Simple Step-by-Step Guide
By Editorial Team
Updated on July 7, 2026

As colder weather approaches, home improvement planning shifts from inspiration to preparation. Before temperatures drop, it’s worth looking at the parts of your home that help keep heat in and moisture out, including insulation, roofing, heating systems, and window sealing.
One simple place to start is learning how to re-caulk windows. Replacing cracked or peeling caulk can help reduce drafts, limit water infiltration, and protect your window frames before winter conditions put your home’s exterior to the test.
Why re-caulk your windows?

Source: Canva
Window caulk seals the gap between the window frame and the surrounding siding, trim, masonry, or wall surface. Over time, sun exposure, rain, snow, temperature changes, and building movement can cause the sealant to shrink, crack, or pull away.
Common signs that it’s time to re-caulk windows include:
Cracked caulk
Peeling or separation
Visible gaps around the window frame
Drafts or air leaks
Water leaks or stains
Bubbles or blisters
Discolouration or mould
Soft or rotting trim
Insects entering near the frame
Inspect exterior caulking at least once a year, especially after winter. Replacing failed caulk early can help prevent moisture damage, window frame rot, and repeated seal failure.
How to Choose the Right Window Caulk and Tools

Source: Canva
Window Caulks
Choose a caulk or sealant based on where it will be used, the material around the window, weather exposure, and whether the joint needs to be painted.
Type of caulk or sealant | Best use | Paintable? | What to know |
Acrylic latex caulk | Interior trim and small gaps | Yes | Easy to apply and clean with water, but not the best choice for exposed exterior joints |
Siliconized acrylic latex caulk | Interior joints and some light exterior applications | Usually | More flexible than standard acrylic caulk while remaining easy to paint |
100% silicone caulk | Exterior windows and doors | Usually no | Good weather resistance and flexibility, but paint may not stick unless the label says it is paintable |
Polyurethane or hybrid sealant | Exterior windows, siding, and high-movement joints | Often | Durable and flexible, but application and tooling instructions vary by product |
Butyl rubber or masonry sealant | Brick, concrete, and masonry siding | Product-dependent | Useful for some masonry applications, but not ideal for every window frame material |
For exterior work, use an exterior-grade window and door sealant that is compatible with your siding, trim, masonry, or window frame. If the joint will be painted, confirm that the product is paintable before buying it.
Avoid using interior caulk outside, even for small repairs. It may not handle moisture, UV exposure, or freeze-thaw cycles well.
Tools and Materials Needed
You do not need professional-grade equipment for a simple window caulking job, but the right tools make the work cleaner and easier.
Useful window-sealing supplies include:
Exterior-grade caulk or sealant
Caulk gun, ideally with a thumb release
Utility knife
Scraper or caulk removal tool
Caulk remover for stubborn old material
Clean rags
Rubbing alcohol or a manufacturer-approved surface cleaner
Painter’s tape
Caulking tool, spatula system, or tooling stick
Closed-cell foam backer rod for deeper gaps, if recommended by the sealant manufacturer
Gloves and eye protection
A smooth-rod caulk gun is usually easier to control than a basic ratchet-style handle. Specialty caulking tools can also help create a cleaner bead, but careful preparation matters more than expensive accessories.
How to Re-Caulk Windows in 7 Steps
Source: Canva
1. Inspect the Window and Existing Caulk
Before removing anything, inspect the window frame, surrounding siding, trim, and old caulk.
Look for cracked caulk, gaps, mould, water stains, loose trim, damaged siding, or soft wood. Spider webs near the frame may also point to air infiltration, since insects often settle near small openings.
Do not simply caulk over rotten wood, damaged frames, loose siding, or persistent water infiltration. These issues may need repair before the window can be sealed properly.
2. Remove the Old Caulk
Use a utility knife, scraper, or caulk removal tool to cut and lift out the old caulk. Work slowly to avoid damaging the window frame, siding, or trim.
For stubborn material, apply a caulk remover and let it soften the old sealant before scraping again. Remove as much residue as possible.
Never apply new caulk over old caulk. The new bead will not bond properly, and the repair is more likely to crack, peel, or fail early.
3. Clean and Dry the Surface
Once the old caulk is removed, vacuum or wipe away loose debris. Remove dust, oils, old residue, and other contaminants with rubbing alcohol or a surface cleaner approved by the sealant manufacturer.
The joint should be clean, dry, sound, and frost-free before applying new sealant. Do not caulk a wet, dirty, or frozen surface.
If the joint is too deep, insert a foam backer rod before caulking. This helps control sealant depth and allows the bead to flex properly. Follow the sealant manufacturer’s instructions for joint depth and backer rod use.
4. Prepare the Caulk Tube
Load the caulk tube into the caulk gun. Cut the nozzle at a 45-degree angle, starting with a small opening that matches the width of the joint. You can always cut the tip slightly larger, but a large opening is harder to control.
If the tube has an inner seal, puncture it before applying the caulk. Apply painter’s tape along both sides of the joint if you want cleaner lines, especially around visible trim or siding edges.
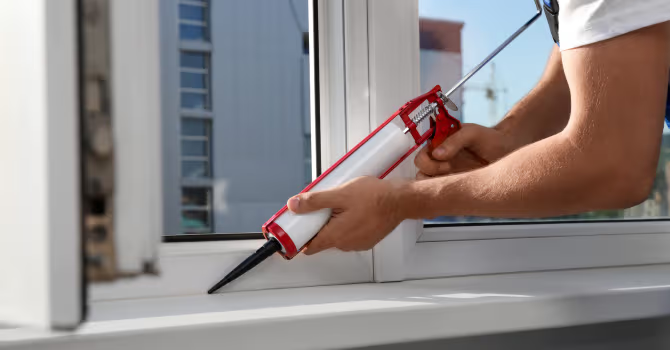
5. Apply the Bead in a Steady Sequence
Place the nozzle at the starting point of the seam and hold the caulk gun at about a 45-degree angle. Keep one hand near the front of the gun for better control.
Start squeezing the trigger gently until the caulk begins to flow. Move along the seam in a smooth, continuous motion, keeping your speed and pressure as consistent as possible. The bead should fill the joint without leaving gaps or piling up.
For a cleaner bead, avoid stopping in the middle of a seam whenever possible. If you must pause, release the trigger or thumb release, lift the nozzle away, and restart by slightly overlapping the end of the previous bead. This helps prevent bumps, gaps, and uneven buildup.
At the end of the seam, release the pressure before pulling the nozzle away. Wipe the nozzle if excess caulk builds up, then continue on the next section.
Do not block window weep holes, moving parts, or drainage paths. These areas are designed to let water escape or allow the window to operate properly.
6. Tool and Smooth the Bead
Smooth the bead while the caulk is still workable. Do not wait until it starts to skin over unless the product instructions say otherwise.
Use a caulking tool, finishing spatula, or gloved finger if the manufacturer allows it. Apply light, even pressure to push the sealant into the joint and against both sides of the surface. The goal is to shape the bead, not scrape most of it away.
Work in short sections instead of trying to smooth a long bead in one pass. Wipe excess caulk from the tool with a damp rag as you go, and avoid dragging extra material along the entire seam.
The finished bead should look even, fully bridge the gap, and have no visible holes or air pockets. If you used painter’s tape, remove it right after tooling while the caulk is still wet.
7. Let the Caulk Cure
Let the caulk cure for the time recommended on the product label. Dry-to-touch, paint-ready, rain-ready, and fully cured are not always the same thing.
Avoid touching the bead while it sets. Do not paint over it until the manufacturer says it is ready, and avoid heavy rain or direct water exposure until the sealant has cured enough for exterior conditions.
If possible, keep the window closed during curing so the bead is not disturbed. Once cured, inspect the seam and touch up only if the product allows a second application.
Common Window Caulking Mistakes to Avoid
Even a good exterior caulk can fail if it is applied incorrectly. Avoid these common mistakes:
Applying new caulk over old caulk
Skipping surface preparation
Caulking wet, dusty, oily, or frozen surfaces
Using interior caulk for exterior windows
Choosing non-paintable caulk for a joint that needs paint
Cutting the nozzle opening too large
Applying too much or too little sealant
Leaving holes or air pockets in the bead
Forgetting backer rod in deeper joints
Blocking weep holes or drainage openings
Tooling a sealant that should not be tooled
Painting before the product is ready
Caulking in rain, extreme heat, or freezing weather unless the product allows it
Textured siding, masonry siding, and fibre cement siding may need extra care because the sealant must make contact with irregular surfaces.
Best Timing and Maintenance Tips

Source: Canva
Spring and fall are often good times to re-caulk windows because temperatures are usually moderate. Many sealants perform best when applied in dry weather and within the product’s recommended temperature range.
For best results:
Work on a dry day
Avoid caulking if rain is expected before the sealant cures
Read the label for application temperature and curing time
Inspect all windows while you have your tools out
Keep photos and product receipts for your maintenance records
How long window caulk lasts depends on the product, weather exposure, surface preparation, joint movement, and installation quality. Annual inspections are the easiest way to catch small failures before they become bigger problems.
DIY or hire a professional?
Re-caulking windows can be a good DIY project when the window is easy to reach, the frame is sound, and the old caulk has simply cracked or shrunk.
Hire a professional if you notice:
Rotten window frames
Damaged trim or siding
Large gaps around the window
Persistent water infiltration
Repeated caulking failure
Structural movement
Insects entering through the frame
Work that requires ladder access at a significant height
Window installers or qualified contractors can determine whether the issue is failed caulk, poor installation, damaged flashing, or a larger building envelope problem.
Does window caulking affect your warranty?
Exterior caulking is often treated as routine homeowner maintenance, but every window warranty is different. If your windows are still covered by a manufacturer’s warranty or labour warranty, review the documentation before replacing the sealant.
Using incompatible products, modifying the window, neglecting regular inspections, or ignoring early signs of failure may affect warranty coverage. If you are unsure whether caulking failure is a warranty matter, contact the manufacturer’s service department or your window installer before starting the work.
Take clear photos before and after the repair, keep the sealant label or receipt, and document the weather conditions during application. This can help if you need to make a warranty claim later.
In Conclusion
Re-caulking windows is a simple maintenance project that can help reduce drafts, improve comfort, and protect your home from water infiltration. The key steps are choosing the right exterior-grade sealant, removing all old caulk, cleaning the surface properly, applying a steady bead, tooling it before it skins over, and allowing enough curing time.
If you find rot, damaged frames, persistent leaks, or repeated seal failure, caulking alone may not solve the problem. In that case, have the window inspected by a qualified professional.
FAQ
When is the best time to re-caulk windows?
The best time to re-caulk windows is usually during dry spring or fall weather. Moderate temperatures help many sealants adhere and cure properly. Always follow the temperature range on the product label.
How often should you re-caulk windows?
Inspect exterior window caulking every year. Many quality exterior sealants can last several years, but service life depends on weather exposure, product type, surface preparation, and joint movement.
Can I re-caulk windows without removing old caulk?
No. New caulk should not be applied over old caulk. Remove the old material, clean the joint, and let the surface dry before applying a fresh bead.
Should I use silicone or latex caulk for windows?
Use the product that matches the location and surface. Acrylic latex or siliconized acrylic latex is often used for paintable interior trim. Exterior windows usually need an exterior-grade silicone, polyurethane, or hybrid window and door sealant. If the joint must be painted, make sure the product is paintable.
When should you hire a professional instead of doing window caulking yourself?
If the window is easy to reach and the caulk has only cracked or shrunk, DIY re-caulking is usually manageable. Hire a professional if you see rotten frames, damaged trim or siding, large gaps, repeated seal failure, persistent leaks, or if the work requires ladder access at a significant height.
Looking for something else?
Related articles
The latest industry news, interviews, technologies, and resources.
Editorial Team
•18 Apr 2024
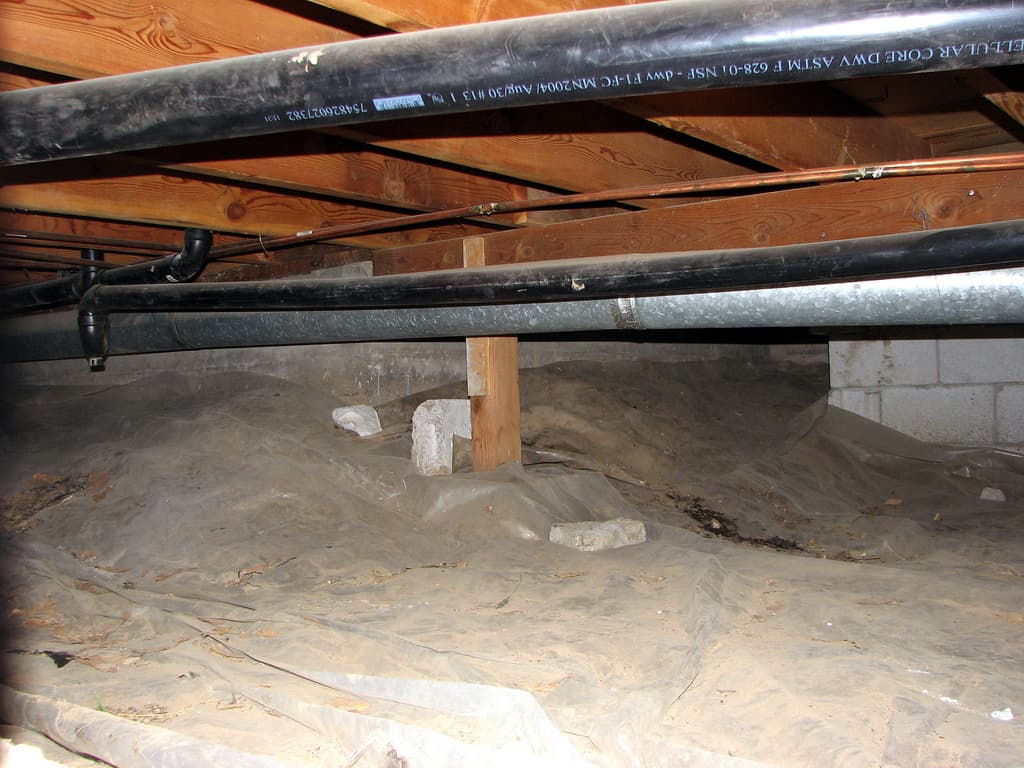
Have you noticed the presence of traces of humidity in your crawl space? You're right to wince because a buildup of moisture is never good news.

Editorial Team
•23 Jul 2025
Ensuring that your flat roof is adequately insulated is a vital part of maintaining a comfortable temperature inside your home. Depending on your budget, you can insulate your roof from the inside or outside. However, to meet Novoclimat’s program requirements, you have to select the appropriate materials and correctly carry out their installation. Discover our advice for maintaining effective insulation and saving on your monthly energy expenses.

Editorial Team
•24 Jul 2024
If your house’s foundation or frame was built years ago, chances are, either one may be nearing the end of its service life. The weakening of your home’s structural integrity can manifest as corroding steel, cracking concrete, and spalling.

Editorial Team
•08 Nov 2023
p.p1 {margin: 0.0px 0.0px 2.0px 0.0px; text-align: justify; font: 14.0px 'Helvetica Neue'; color: #454545} p.p2 {margin: 0.0px 0.0px 0.0px 0.0px; text-align: justify; font: 12.0px 'Helvetica Neue'; color: #454545} p.p3 {margin: 0.0px 0.0px 2.0px 0.0px; font: 14.0px 'Helvetica Neue'; color: #454545} p.p4 {margin: 0.0px 0.0px 0.0px 0.0px; font: 12.0px 'Helvetica Neue'; color: #454545}

Léa Plourde-Archer
•08 Nov 2023
When we talk about decor or design on the blog, we usually focus on home decor. This allows our readers to find sources of inspiration to create the perfect layout for their home. But what about those who are looking for ideas for their business?