How to apply ceramic grout in a few steps
By Christine Simard
Updated on November 8, 2023

While some renovations require professional assistance, others can easily be done on your own. Of these jobs, applying grout is probably one of the easiest to perform, especially if you like getting your hands dirty!
Perfect for a DIY project or for the application of new tiles, here is a small practical guide that can help you before carrying out this work.
Applying ceramic grout: how to proceed?
Before you start applying your grout
If the surface to be worked on is close to a wall or in between 2, it is preferable to protect them with masking tape to avoid any spills outside the working surface. Also, if you are working above a counter or working on a specific piece of furniture on the floor, be sure to protect them with a plastic sheet.
Buying the perfect grout for your project
There are several types of grout on the market to give you access to different finishes and a multitude of colors. To make the right choice, it will first be necessary to determine where the grout in question will be placed: on a kitchen or bathroom floor or perhaps on a small piece of furniture to restore or a backsplash?
Each of these projects, although all involving the installation of tiles, must meet different expectations and needs. This is why various types of grout are currently available on the market. Among these, we find:
Grout with sand;
Without sand;
Higher yield;
Pre-mixed;
Caulking grouts;
Epoxy grouts;
Cementitious.
To learn more about the specifics of these products, we invite you to read our article Ceramic grout: products and maintenance.
In terms of color, Rona hardware stores mention:

Source: thedesignfiles
The tools you will need
For an easy and hassle-free application, there are some tools you will need to apply your grout.
To mix the chosen product, you will need:
a bucket or large container;
a trowel (for mixing by hand) or a drill with attached paint mixer.
For the application:
masking tape;
rubber gloves;
a float or a leveler;
a sponge or magic eraser;
a rag or an old cloth.
1. Mix the grout
This step is simple: be sure to follow the directions listed on your product. There are no magic equations to be sure how much you need for your project, but it is recommended that you calculate an extra 10% for your mix.
Once mixed, let the grout sit for 10 minutes and mix again as needed until the desired consistency is reached.
2. Prepare the work surface
To ensure that the grout adheres without problems, it is best to clean the tiles with a damp sponge or cloth to remove any dirt or dust that has lodged on them. It will also be good to moisten the surface before applying the grout to facilitate its adhesion.
If your tiles are made from a porous material (such as natural stone), apply a coat of sealer suitable for the material to prevent the grout from staining the tiles indefinitely.
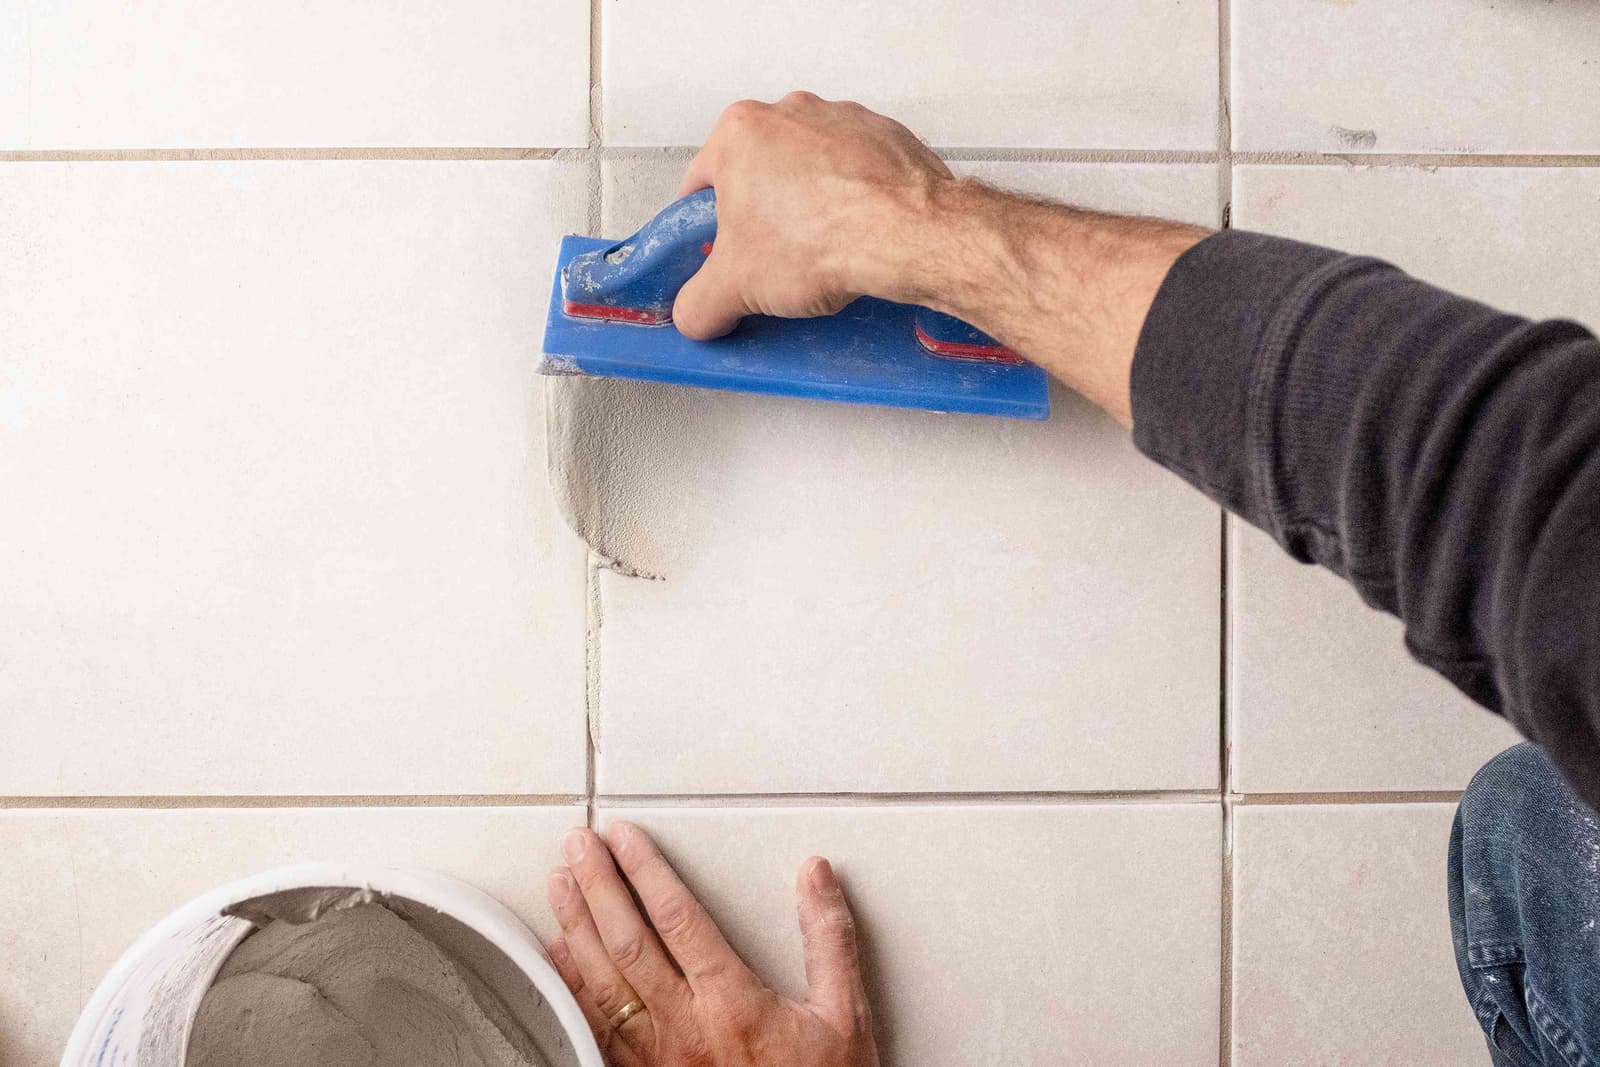
3. Apply the grout
Focusing on small sections at a time, spread the grout diagonally from bottom to top using your leveler, making sure to keep it at a 45-degree angle. We mention the diagonal because this method will force the grout into the joints of the tiles.
When the application is complete, go over the surface a second time, this time at an angle almost perpendicular to it, to remove the excess grout that remains on the surface of the tiles.
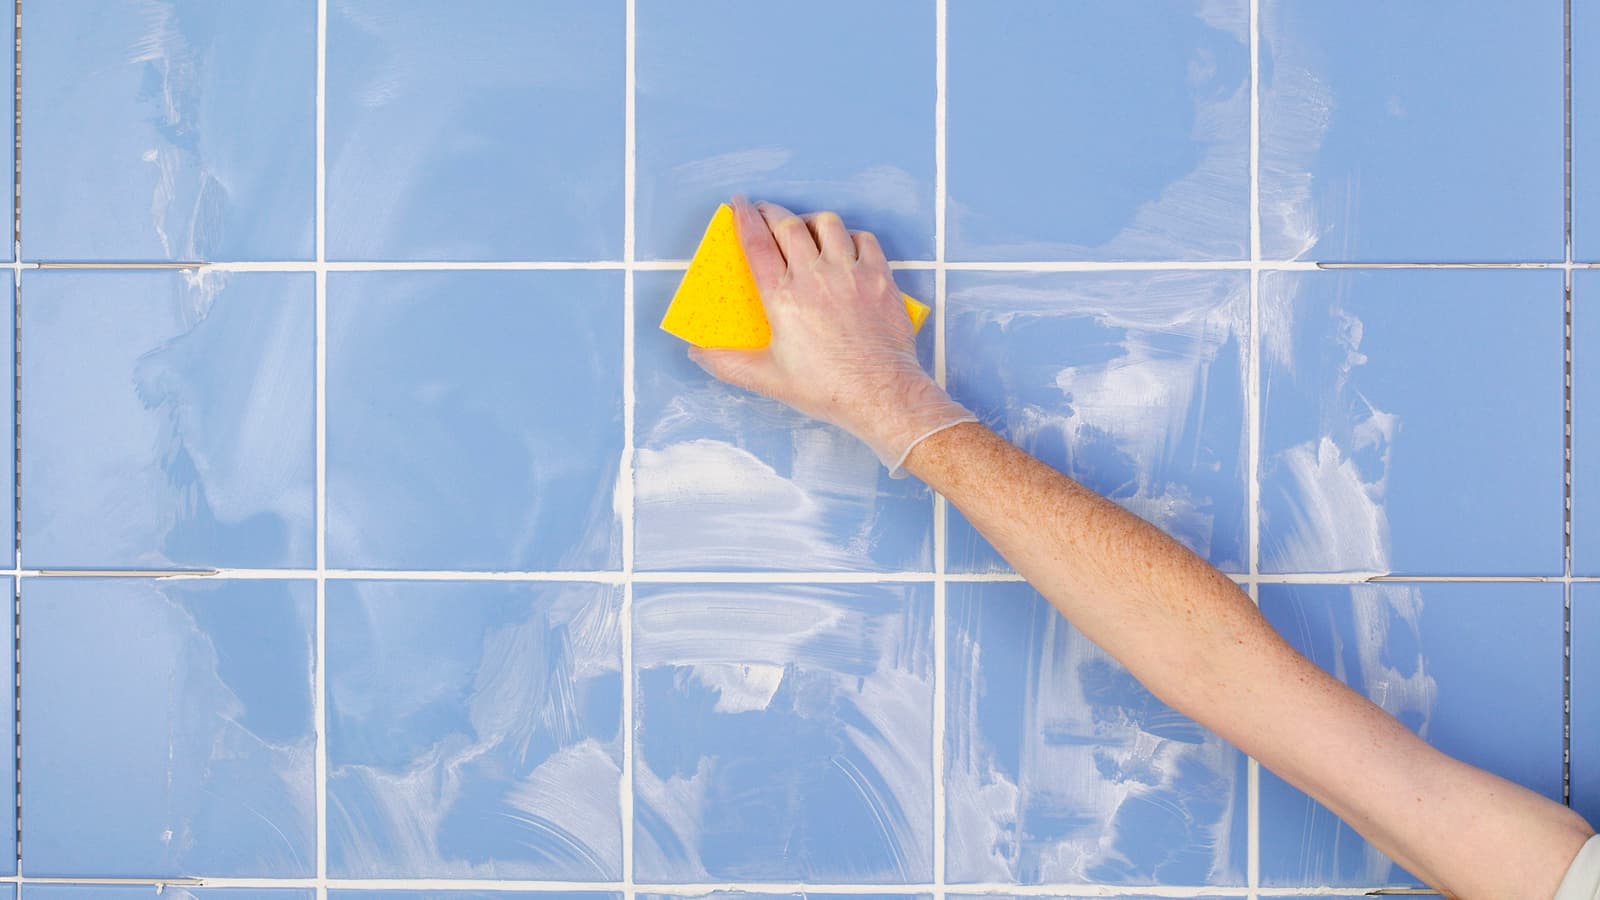
After about 10 to 20 minutes, the grout will have started to set. You can therefore remove the excess grout with a damp sponge, which will also allow you to clean the tiles. Be sure to clean your sponge frequently to avoid soiling the tiles even more.
Source: The Spruce
4. The final finishing touches
Once the surface is cleaned, all you have to do is polish the joints to give the tiles their final look. To do this, you just have to run your finger (with or without a rag) over the joints to flatten them well and remove the excess grout!
It is best to wait 24 hours before applying a second coat.
Get 3 renovation quotes for your bathroom tile project
RenoQuotes.com can help you get quotes for your bathroom tile renovation project. If you submit your project to us, we’ll put you in contact with top-rated contractors. Fill in the form on the homepage (it only takes a few minutes), and you will get estimates from trusted professionals.
Dial 1-844 828-1588 to speak with one of our customer service representatives
Looking for something else?
Related articles
The latest industry news, interviews, technologies, and resources.
Editorial Team
•20 Mar 2026
Whether it’s getting ready in the morning before leaving for work or treating yourself to some well-deserved R&R at the end of a long day, the bathroom is a space where one spends a considerable amount of time. And that’s why a bathroom that’s been hit hard by the passage of time can quickly become a nuisance, both in terms of function and aesthetics. Fortunately, the latest bathroom design trends can help turn your space into a modern and calming retreat.

Editorial Team
•08 Nov 2023
If you haven’t heard of a wet room before, we recommend you start paying attention to this growing trend. The wet room is becoming more desirable as a minimalist, one-of-a-kind feature that works to add value to your home.

Editorial Team
•02 Apr 2026
Are you finding yourself hoarding more and more stuff, are your kids getting older, and moving out yet your house is shrinking in front of your eyes? If your home no longer meets your needs in terms of space, maybe it’s time to consider a home extension or addition project. Maybe a kitchen extension, storage area, or a new family room is in the books.

Cynthia Pigeon
•02 Aug 2024
When you start building or renovating your house, you’re faced with many choices, especially in terms of land location, the type of house you want (or have), the types of materials to be used, etc. Regarding the latter, it's imperative to select quality masonry materials to have a solid foundation, which will withstand heavy loads and the test of time. That said, are you looking to make an informed decision about which products to use? This article will allow you to get an overview of the types, brands, and prices of commonly used masonry materials.

Editorial Team
•04 Oct 2024
Technically speaking, DIYing your entryway decor with tile is entirely possible. However, from an aesthetic point of view, the whole process can be quite risky.