Wall panels are a wonderful feature for the home, and they come in a variety of materials, shapes, styles and colours. Therefore, they can be used alongside almost any home decor, made to suit the needs of any homeowner. Panelling can cover an entire wall, or just half if you so choose. Installing wall panelling is a DIY project that can be easily accomplished with the right steps and the options are endless!
If you’re a homeowner with a reduced budget, all you require is careful planning and a little bit of energy to complete this project. Plus, we’ve got the step-by-step guide to help you successfully achieve it. So, read on and soon enough you’ll have brand new panelling installed on the walls of your home.
Here is our guide for installing wall panels
Choose and Gather Materials

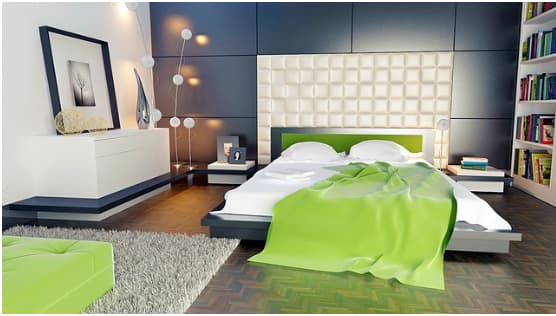
source: Flickr, MyWallArt
Depending on the materials you choose, the installation process will vary slightly. But of course, the first step is choosing and collecting these materials. The style of panelling you decide on will have a significant impact on the room, as well as the rest of your home, so make sure to consider the style of your entire home.
A home with traditional properties would suit Victorian or Georgian panelling, whereas a home with a classic look and cleaner lines will require something minimal. Panelling generally comes in board or sheet form, again greatly depending on the material. Remember to keep this in mind when thinking about how much you must buy.
To prepare for the installation, homeowners should first measure the area you'd be hoping to cover. This will determine how much material you’ll need. As we have mentioned, the method of measuring will depend on the panels you choose, and how they're sold. If there are doors, windows or other devices in the way, subtract these areas and think about the ways that the panels will hug around them.
Also, take note of where sockets, switches, and wall lights are located, and how they will be refitted into the panelling. Panels will need to be spaced evenly apart, and the width will depend on the length of the wall you are covering. Homeowners will want their panels to create a uniform effect, so consider working within a space that will allow for this.
Also, think about finishes you may need to do alongside your panels. Dado rails are often offered alongside certain types of panelling, fitting on top to finish off the edge. Shelving is another option to consider for a uniform finish.
Prepare the wall before installing the wall panel
Once materials have been gathered, lay these materials on the floor to match them up and make sure they align correctly. If you are working with wood panelling, bear in mind that wood expands and contracts depending on the temperature. Therefore, wait until wood panelling has reached a neutral temperature before moving forward with an installation. Bear in mind that this will sometimes take between 2 and 5 days depending on your region's climate.
Before installing the panels, make any necessary repairs as homeowners will want to ensure that the wall is even and flush so that panels can be installed smoothly. If there are any protruding surface materials, remove these and seal any holes in the wall. Now, locate the placement of the studs in the wall and use a pencil to mark their location.
If necessary, furring strips can be attached to the studs to provide a space for nailing the wall panels but must be flat to ensure that the panels will lay flat. If you are installing panels on a framed wall, studs should be spaced properly apart. Also, make sure to remove moulding, trim as well as fixtures that might get in the way of the panelling installation. Save any moulding or trim that you may need to reinstall following the panelling installation. To avoid electrocution or injury, turn off all electricity before moving forward with the project.
Install the Wall Panels

source: Logo
After preparing the wall, and marking the placement of the studs, plan for the installation to start at the left side of the area where you’re attaching the wall panels. There are a few diverse ways that you can go about installing the panels, and this will come down to the style of panelling that you’re installing.
A common method is to install panels with an adhesive or glue. If you are working with glue, apply it to the backs of panels in a zigzag pattern, and use pins to hold them in place as they dry. Make sure to leave space between each panel, approximately 1mm, as certain materials may expand while they dry.
As soon as the glue dries, remove the pins or counter stick them. Following this, lightly nail panels at the top, further securing them into the wall. If you are working with wood panels, lightly tap the bottoms with a hammer to further secure the glue.
Next, drive nails into the panels, approximately every four to eight inches. Follow manufacturers' instructions regarding what type of nails would be best for your wall panels. Depending on the material you are working with, nails will be visible, so make sure that they are spaced to appear aesthetically pleasing.
Also, when nailing panels into place, work from one end to the other, as nailing from side to side can cause pockets to form in the material. Be gentle when driving nails in, as being too rough will cause damage to the panel surface. To finish, countersink and putty nails.
Finishing Up
Depending on the type of panelling, replace or add new moulding around floor or ceiling to complete the project. Glue and nail the moulding in place, using finishing nails. If you are working with wood panelling, use wood putty to cover over nails. Hopefully, once this job is complete, you will have some stunning results to admire over.
Get 3 renovation quotes for your decorative wall panelling project
RenoQuotes.com will put you in contact with 3 reliable contractors for your wall panelling project. Fill in the form on our homepage (it only takes a few minutes), and you will receive quotes from trusted professionals.
Dial 1-844 828-1588 to speak with one of our customer service representatives
Looking for something else?
Related articles
The latest industry news, interviews, technologies, and resources.

Editorial Team
•23 Jul 2025
When you're about to start home renovation work, getting insurance is essential to avoid major headaches if something goes wrong. In 2025, with rising material costs and an increase in damage linked to natural disasters, this precaution is more important than ever. So why is it so crucial? And how do you go about getting insurance? SoumissionRenovation.ca gives you the keys to securing foolproof coverage.

Editorial Team
•08 Nov 2023
Feeling like your bathroom needs a makeover? Need to increase your storage space? Renovation projects can be very expensive. Plumbing, flooring installation and custom-made furniture are all projects that can easily become quite onerous.

Cynthia Pigeon
•25 May 2026
For many Montréal homeowners, the basement represents a vast amount of untapped potential. Whether you want to accommodate a growing family, set up a home office, or create an independent apartment, maximizing this space is a strategic decision. However, trying to act as your own project manager in an older home in Plateau-Mont-Royal, Rosemont, or Westmount can quickly become complex. Between coordinating the plumber, electrician, drywall finisher, and carpenter, the risks of errors, delays, and cost overruns are high.

Editorial Team
•13 Mar 2024
Glass is beyond fragile, and at one point in time, any of your window panes could crack or even shatter, allowing outside air to filter into your home. A broken window pane can result from debris kicked up by the wind or from a rock colliding with your glazing. Regardless of the damage, repairing the glass pane as soon as possible is the best way to go.
Editorial Team
•11 May 2026
There are many reasons why you might want to consider using methods other than heat pumps, baseboard heaters, or electric furnaces to warm up your home: winter’s afoot and you're already dreading the fact that your Hydro bills are going to skyrocket; your home has a number of back rooms that aren't properly heated by a central heating system; you live in an area that’s prone to power outages, high winds, and freezing rain. Perhaps the time has come to change your heating appliances and you still haven't decided on what type of system to replace them with, or you'd simply like to embrace an eco-friendly, energy-self-sufficient lifestyle…