Do you remember that famous old folktale your grandparents would tell you about, the one that probably made it hard for you to comfortably use the toilet without first looking in the bowl, on the off chance that a sewer rat was just wading in there, ready to nip your behind?
Let’s say that, nowadays, it’s highly unlikely that such a situation could happen, since household sewer pipes are now fitted with check valves, also known as backflow preventers.
In the 21st century, it’s all the more common to have, maintain, or change such devices to prevent water leaks in our basements, especially when knowing that municipalities aren’t made responsible for any damage caused to properties in the event of a sewer backflow. Some people also worry about climate change resulting in heavier and more frequent rainfall and want to make sure that they have the appropriate check valve in place. Hence why having check valves in your basement is all the more desirable.
In any case, if you’re a homeowner or a property renter living in proximity to solid ground, it’s best to add a clause in your home assurance contract that covers such mishaps that are totally out of your control and check whether the current installations are up to code (CSA standard certified and in compliance with article 2.4.6.4 of the Quebec Construction Code).
How Does a Check Valve Work?

Source : Canva
In the event of heavy rains or when the snow melts really fast come springtime, there’s a good chance that the collector sewers in your municipality aren’t able to keep up. When they overflow, they’ll leak through the piping, floor drains, and sanitary devices in your home. This exact problem can occur as a result of a break or an obstruction in underground canalization.
Therefore, to prevent greywater, that’s potentially a carrier of malodorous smells and bacteria, from destroying your belongings and resulting in a loss of time, money, and energy, installing check valves on your drainage pipes is a must.
Note that retaining basins, sump pits, and running traps found beneath street level must also be fitted with check valves. The same goes for household sanitary appliances located beneath a septic tank’s overflow mark.
The check valve principle is rather simple and logical. Simply said, it controls the direction in which the water flows through canalization, with the main goal being that the water coming from your household flows outward instead of having, on the other hand, outside water leaking into your home.
Some valves solely shield one sanitary device, like a toilet; in such a case, multiple valves will be required. Others can be fitted to a pipe or connected to numerous other household apparatuses. Given that, naturally, they’ll be various ways to install a check valve depending on the type of property in question.
Types of Check Valves

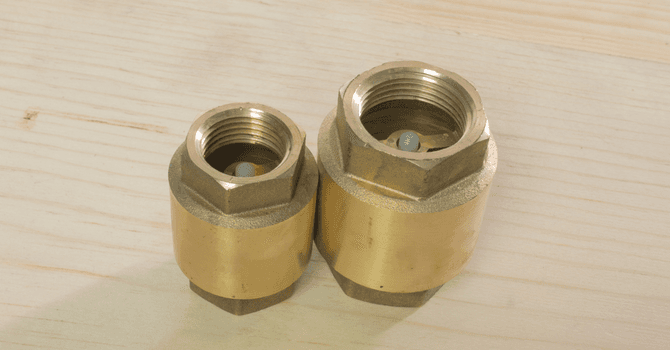
Photo: Flickr
Normally Closed Check Valve
Its shutter, basically the little flap or valve, is affixed by its top section and hangs downward, and can solely move one way. Given its position, it allows that when the toilet is flushed, the water must push past the flap to drain. On the other hand, if the water is coming in from outside the household, it’ll flap against the valve instead of pushing through and flowing freely through the piping.
This type of valve still has its downsides. Since it’s always in a closed position, unless it’s being pushed open by household greywaters, it restricts airflow in the piping network. It’s usually installed in hard-to-reach areas, making cleaning the device a rather complex endeavour, more so, its shutter is prone to damage resulting from the cable used during the maintenance process. Furthermore, the flap is conducive to a buildup of residue that could clog the valve or hinder its efficiency in the event that a city sewer backflows.
For these reasons, this model is more often found beneath older homes, having been installed on the main drain line according to former building codes.
Normally Open Check Valve
Its shutter is, opposed to the previously-mentioned model, affixed by the bottom section. The flap is thus laid flat awaiting outside water flow to rise and block the way. As such, airflow is not blocked and provides easy access to maintenance tools. This model is favoured for single-family homes.
Squeeze-In Check Valve
Mostly used for floor drains, and that, solely if permitted by the municipality. An elastomeric ring and brass plates maintain the device in place inside the pipe, right beneath the drain’s cover.
Inflatable Check Valve
Controlled electronically, the device will inflate and block the pipe once water backflow is detected. It doesn’t require any maintenance.
Locating the Check Valve

Source : Canva
First off, to know whether your home has a check valve, look in your basement. If so, there will be a round, twist-off lid at floor level. However, if you have a dewatering pump, look around the latter. When in doubt, or if the plumbing is more complex, ask the previous homeowners or call in professionals.
To avoid ending up with your neighbour’s greywater all over your living room floor, make sure your home is fitted with good condition, standard check valves.
Cost of a Check Valve

Source : Canva
There are numerous factors to consider when trying to gauge the cost of installing a check valve. For example, based on the chosen model, expect to pay between $40 to $200 per valve. Think about the number of valves needed as well as the plumber’s rate. Will the work require additional fees, such as those related to digging to access the current check valves and then to backfill? Your best bet is to inquire prior to jumpstarting the work to save money.
If you’re looking to go forward with a renovation or an inspection, you first must call a plumbing contractor that’s a member in good standing with the CMMTQ (Corporation des maîtres mécaniciens en tuyauterie du Québec). In Montréal, there’s a program that was set up to put you in touch with certified inspectors that’ll ensure your valves are in good working order and located in the right place. Simply dial 311.
It’s of utmost importance to deal with qualified professionals if your home is older or has a flat roof. The original fittings might combine rainwater with wastewater or the recommended valve happens to be an open check valve type, which could make the whole process a lot more difficult should the person not have the right tools on hand.
Do you have a check valve project in mind?
Check Valve Maintenance
Check valve maintenance is best done once a year, ideally at the end of spring; following the freeze/thaw weathering period, thus after the heaviest water flow inside your pipes. The purpose of maintenance is to ensure that no debris is limiting the valve’s flap from opening and closing, and in the event that a metal valve is used, to check the overall corrosive state of the device.
For valves located behind walls, underneath a raised floor, or in the ceiling, you can make a removable panel to easily access the device.
If you decide to check the device and carry out the maintenance yourself, here are a few useful tips:
Wear gloves; suffice it to say that you’re dealing with greywater, a liquid in which bacteria grows and could be potentially harmful to your health.
Remove the access cover or stopper by unscrewing it or unlocking it.
Remove the flap to clean and check the condition of the rubber gasket. Obviously, if it’s broken or damaged, swap it out for a new one.
Thoroughly clean the hinge and put the valve back in place.
Make sure that it’s positioned correctly and put everything else back together. Note that there are some more recent models with a built-in cleaning system.
Get 3 renovation quotes for your plumbing project
RenoQuotes.com will put you in contact with 3 reliable contractors for your plumbing project. Fill in the form on our homepage (it only takes a few minutes), and you will receive quotes from trusted professionals.
Dial 1-844 828-1588 to speak with one of our customer service representatives.
Looking for something else?
Related articles
The latest industry news, interviews, technologies, and resources.

Editorial Team
•22 Jul 2025
Depending on the household, the utility of the basement differs from place to place. Whether it’s used as a family room, a home theatre or your personal warehouse, there is always room for improvement. However, when it comes to acting on this desire for change you may be faced with a lack of inspiration.

Editorial Team
•03 Nov 2025
Water is essential to the wellbeing of humans, but as we know, this natural element can be both a blessing and a curse. Flooding is common in regions with high rainfall levels and proximity to large bodies of water.
Cynthia Pigeon
•05 Sep 2024
Ready-made shower stall kits can be purchased, and these include the shower tray, panels, doors, profiles, faucets, drainage system and mounting screws. This article has for purpose to explain how to install a shower stall sold as a kit.

Editorial Team
•02 Jul 2024
We’ve said it once, and we’ll say it again: The simplest or most subtle details will often be the ones that most impact your decor. Little touch-ups here and there like painting over walls and kitchen cabinets, or adding shelves are practical tips for those who’d rather avoid extensive renovation projects.

Amanda Harvey
•08 Nov 2023
To any homeowner, termites are a dreaded potential pest. Although they play an important role in the ecosystem by recycling wood, facilitating the decomposition of organic matter, replenishing essential nutrients in the soil and assisting in the growth of new plant life, these little buggers can't tell the difference between a tree and a house.