How to Fix and Maintain Foundation Parging
By Léa Plourde-Archer
Updated on March 9, 2026

Foundation parging is a product that fulfills both useful and aesthetic functions. It is used to cover the exposed part of the foundation of your house. However, although practical, it does not last forever!
Exposed to the elements, it tends to degrade over time and that is why it is important to inspect it from time to time to diagnose possible problems. Here is some information that can guide you during the annual maintenance of your parging.
How to Fix and Maintain Foundation Parging Showing Signs of Wear?

Source: Canva
In Canada, foundation parging mostly serves as a coating layer covering the exterior facade of a building’s foundation walls. The product is mainly decorative but it also helps protect the surface on which it has been applied.
Being exposed to harsh weather, over time, foundation parging tends to fade and accumulate dirt. But the main problem comes with the fact that it may start to crack. Dirt can easily be cleaned off using a pressure washer. However, the presence of cracks indicates bigger problems.
Here are a few things to know about fixing and maintaining foundation parging:
The tools you need to repair your parging
To repair your exterior coating, you will need the following tools and products:
an acrylic coating (providing good durability and protection from ultraviolet rays) ;
a sponge or brush (if maintenance was done the previous year) ;
a pressure machine (if the last cleaning was done a few years ago) ;
an antifungal treatment ;
a trowel ;
a triangular scraper.
Here are a few tips to follow

Source: Canva
Before you start repairing the layer of parging, check the weather forecast. The products that you’re about to use are meant for temperatures over 4'C. Ideally, there shouldn’t be any rain during 24 hours following the product application.
The sun could also prove to be a nuisance as it will make the product dry too fast. For a good result, you will have to humidify it repeatedly. During the first step of the process, the surface has to be properly cleaned, paying special attention to the cracked areas. If the foundation parging has been cleaned recently, a damp sponge and a brush should do the job.
However, if the last cleaning happened a long time ago, it’s better to use a pressure washer to properly remove grease deposits, the earth and the sand that have accumulated on the surface of the parging. After the foundation walls have been washed, an antifungal product must be applied.
Next, using a triangular scraper, start lightly digging inside the cracks to check if the parging that is already in there is still solid. If the parge coat starts to crumble, stop what you’re doing. This is a sign that you’re going to have to replace the whole layer.
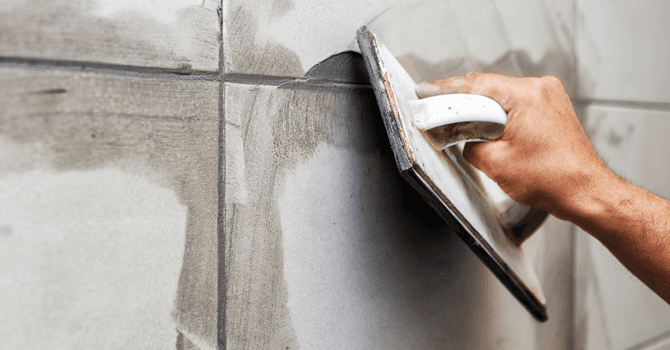
Otherwise, you’re free to start the next step. Please wear protective equipment on your eyes, nose and mouth as this step could expose you to a lot of dust. The following step involves using a trowel to apply a coat of parging product, being careful not to exceed a thickness of 3/8 inches.
Once the product has been applied, it can be moulded for a period lasting approximately 40 minutes. After that, it starts to harden. From time to time, make sure you humidify the surface.
The acrylic coating must be applied one coat at a time, so you’ll have to wait until the next day to apply a second one (if need be).
In all cases, read the instructions on the product’s packaging, as each product has its specific characteristics. Make sure the cement is not exposed to rain during the drying period (which lasts about 24 hours). Once you’ve finished repairing the parge coat, get into the habit of conducting regular maintenance on the foundation walls.
The type of paint you need

Source: Canva
Of course, to be satisfied with the final result, it will be necessary to opt for an acrylic-based paint manufactured with microporous products. This type of paint is specially designed to be applied outdoors.
Although it is generally used to paint exterior woodwork, it is perfect for outdoor parging due to its many advantages, including:
it offers excellent weather protection ;
it’s washable ;
it allows the medium to breathe ;
it effectively masks support irregularities.
It should be noted that the application of paint on a parging surface can pose some difficulties, which is why it is sometimes preferable to entrust this project to professionals.
However, if you want to do it yourself, note that the application of the paint should be done with a rubber roller and not with a standard one.
Factors that may cause the foundation parging to crack
The most common causes of cracked parging are the house moving, the weather and temperature changes. Cracks that measure less than 1 cm should not raise concerns in the short term unless there are many of them. To know if the cracks are active or not, take down detailed information about their current size and come back a few months later to see if they have changed.
However, don’t wait too long because if you see that the crack is active, you’ll have to fix it quickly. Whether the cracks are deep or superficial, always try to understand what exactly caused the damage, so you don’t repeat any previous mistakes (for example the type of product used to complete the work).
Parging should be left to professionals, even when the damage level is minor. Resurfacing is a tough job and mistakes will be hard to correct. Since foundation walls are usually visible, even the slightest flaws will pop out and affect the house’s appearance. Also, if you notice that the damage is too significant, the parge coat will have to be removed and replaced altogether.
Select a product that best suits your needs and that offers several useful properties (protection against UV rays, durability). If, while work has already started, you run out of product, always buy the same one. Otherwise, you may see differences in texture and colour.
How much does foundation parging cost?
If the work needs to be started from scratch, you should expect to pay around $10-$18/square foot.
You can also take a look at our cost estimator for more information!
Get 3 quotes for your renovation project
RenoQuotes.com can help you get quotes from a general contractor. By submitting your project, we’ll put you in contact with top-rated contractors. Fill in the form on the homepage (it only takes a few minutes) and get estimates from trusted professionals.
Dial 1-844 828-1588 to speak with one of our customer service representatives.
Looking for something else?
Related articles
The latest industry news, interviews, technologies, and resources.

Editorial Team
•24 Sep 2024
Aluminum welding is considered one of the most dangerous metalworking trades. This line of work mandates expert technique and constant safety measure awareness. The hazards inherent to the trade can have disastrous effects on the health and safety of workers. Consequently, this article will focus on the various dangers faced by aluminum welders and outline essential safety measures to minimize these risks.

Editorial Team
•08 Nov 2023
It can’t be denied that the summer season is enjoyable for almost everyone, with hot days and warm nights that can finally be spent outside. But sometimes, the temperatures reach a peak and joy slowly moves towards discomfort. Luckily, technology has allowed for the air conditioner.

Editorial Team
•25 Sep 2024
Ceramic tile flooring has a slew of advantages. Not only is it a resilient and long-lasting material, but it also requires minimal maintenance and is likely to increase the value of your home.
Editorial Team
•16 Jun 2026
When properly installed, ceramic tiles are a beautiful resurfacing option. The complexity of a tiling project lies not so much in the execution but in the details required to do it right.

Editorial Team
•05 Dec 2025
Energy efficiency in a home is a key issue, especially during the winter months, and even more so if it is an older structure. Having effective insulation is frequently listed as the first step to reducing heating costs.