The roofing framework is the literal bones of your house. It ensures that your roof can withstand weather changes and, given its slope, whether it’s waterproof or not.
Get Your Project Started Today
Submit your details and receive three free quotes from trusted contractors.
With the help of this article, you’ll discover the key elements that one must know, inside and out, to understand roof building, as well as some tips so you can actually build a functional roof or proceed to properly renovate the framework.
In this article, we’ll also reveal the 8 steps to building a gable or monoslope-type roof frame, as well as how you can gauge the cost of such a project.
Roof Edge and Section Terminology
Understanding the specific terms used to describe the edges and sections of a roof is essential for anyone planning, building, or renovating a roof. Here are the most common terms, along with clear definitions and their roles in roof design:
Ridge: The highest horizontal line where two sloping roof planes meet. It forms the peak of the roof and is a key reference point for roof construction and water drainage.
Hip: The external angle formed by the intersection of two sloping roof planes. Hips run from the ridge down to the eaves and are found on roofs with more than two sides (such as hip roofs).
Valley: The internal angle where two sloping roof sections meet, forming a channel that directs water off the roof. Valleys are prone to collecting debris and require proper flashing for waterproofing.
Gable: The triangular section of wall at the end of a pitched roof, between the edges of the two roof slopes. Gables are found on gable roofs and help define the roof’s silhouette.
Gable End / Rake: The edge where the gable terminates. The rake runs along the sloped sides of the gable from the eaves to the ridge.
Eaves: The lower edges of the roof that overhang the building’s walls. Eaves help direct water away from the structure and are often the location for gutters.
Cornice: The decorative molding or projection at the meeting point of the roof and the wall, often found on the gable end. It serves both aesthetic and functional purposes, helping to shed water away from the building.
Hipped Edge: The sloping edge where two hip roof planes meet, running from the ridge to the building corners.
Ridge Tile: Special tiles installed along the ridge to cover and protect the joint from water penetration.
How These Sections Work Together:
The ridge sits at the top, with hips and valleys sloping down from it.
Gables and gable ends define the ends of gable roofs, while eaves run along the lower edges.
Cornices and rakes finish the roof edges, providing both protection and style.
Understanding these terms will help you communicate clearly with roofing professionals and better visualize how your roof is constructed.
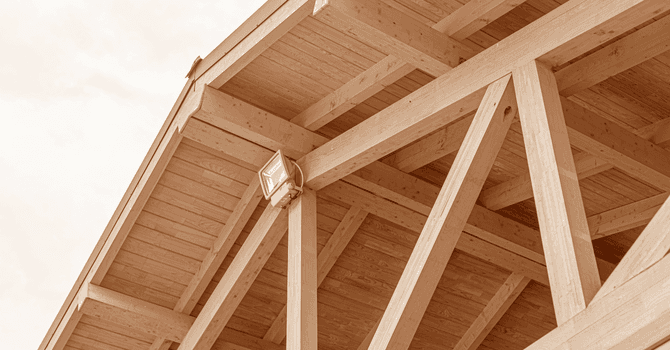
Wood Framing Roof Structure
Source: Canva
Here are the elements that constitute a roof frame according to their vertical force distribution:
Rafters: long wooden beams that support the roof covering. These are secured in the direction of the roof’s slope (let’s say vertically).
Battens: long and slim pieces of wood that are fixed parallel to purlins, to help support the roof rafters.
Purlins: three beams that are laid horizontally to form the structure on each slope.
The ridge purlin: makes the top of the roof.
The middle purlin: is found in the middle of the slope.
The eaves purlin: makes up the slope’s end. It stabilizes the roof trusses, which we’ll also look over.
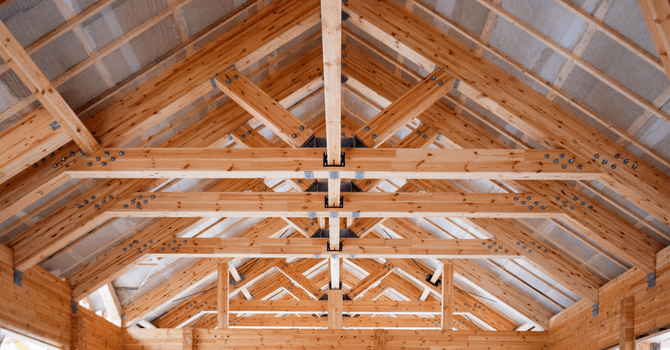
One has to account for five roof purlins within the structure: one in the middle, and two on either slope. If you’ve ever seen a framework, you’ll know very well that up until now, there are still a few beams missing that reinforce the structure and render it capable of supporting the weight of snow or a strong gust of wind. That would be the trusses. The trusses are the main structural pieces of the whole roof.
Roof trusses: these are triangular-shaped and hold up the frame’s structure. Each truss is made up of multiple pieces.
Crossbeam: is a vertically fitted beam, like the rafters, mentioned above. Together, they form the slope of the roof.
Tie beam: is a horizontal beam which forms the base of the triangle allowing roof support. It can be simple, oblique, or pulled back.
King post: a vertical piece of wood positioned to function as a load-bearing wall. Connects the tie beam and the roof truss.
Struts: are beams that link the king post and the rafter. They act as a strengthening feature in the roof truss due to their square shape. This anchor structure is deemed stable with struts positioned at 55°. Anything below 45 is considered structurally unsound.
Purlin cleat: a small piece of wood that holds the purlin to the crossbeam, helping support the rafters and the roof covering.
Truss strut: similar to the strut, it additionally supports certain types of trusses.
Collar beam: also between the rafters, but situated higher up and used to provide additional support to the frame in case of vertical weight (heavy snow or ice).
Each of these pieces will make up the roof’s framework, and they’ll be fitted to beams — in other words, load-bearing walls. Even though we’ve just gone over the elements that constitute a frame, there are still other types of roof trusses, depending on the type of roof you want to build.
Functional and Protective Elements of a Roof
A roof’s long-term performance depends on more than its frame; the following components work together to provide weatherproofing, insulation, and drainage:
Underlayment: A waterproof or water-resistant layer installed directly over the decking, underlayment acts as a secondary barrier to moisture. It protects the structure from wind-driven rain or ice damming that can penetrate shingles.
Flashing: Thin metal strips (usually aluminum or galvanized steel) installed around roof penetrations (chimneys, vents, valleys, and joints) to prevent water from seeping into vulnerable areas.
Shingles: The outermost protective layer, shingles are installed in overlapping rows to shed water and shield the roof from UV rays, wind, and precipitation. They can be made from asphalt, wood, metal, or other materials.
Insulation: Placed below the roof deck or between rafters, insulation minimizes heat loss in winter and heat gain in summer, improving energy efficiency and comfort.
Drip Edge: Metal flashing installed along the roof’s edges to direct water away from the fascia and into the gutters, protecting the underlying roof structure from water damage.
Gutters: Channels fixed along the eaves to collect and direct rainwater away from the building’s foundation, preventing erosion and water damage.
Each element plays a vital role in keeping your home dry, energy-efficient, and protected from the elements. Proper installation and maintenance of these parts are essential for the roof’s longevity.
Common Roof Features and Accessories
In addition to the main structural components, most roofs also include features and accessories that serve important functional or aesthetic roles. Here are some of the most common:
Chimneys
Chimneys allow smoke and gases from fireplaces or heating systems to safely exit the home. When adding a chimney, ensure the roof framing accommodates the opening and that flashing is properly installed to prevent leaks.
Roof Vents
Roof vents help ventilate the attic, reducing heat and moisture buildup that can damage the roof structure over time.
Skylights
Skylights are windows installed in the roof to bring in natural light. Installing a skylight requires cutting through the roof frame and reinforcing the opening with trimmer joists to maintain structural integrity.
When installing a skylight, always consult local building codes and consider professional installation to prevent leaks and ensure proper structural support.
Dormers
Dormers are roofed structures that project vertically from the main roof, usually containing a window. They add space and natural light to upper floors. Dormers require careful integration with the roof framing for support and weatherproofing.
If you plan to add a dormer, have a structural engineer assess your roof to ensure the framing modifications will maintain the roof’s strength and weather resistance.
Downspouts
Downspouts are vertical pipes that direct water from the gutters down to the ground, helping to protect the building’s foundation from water damage.
Regularly check downspouts for clogs or damage to keep water flowing freely and protect your foundation.
Splash Blocks
Splash blocks are placed at the bottom of downspouts to channel water away from the foundation and prevent soil erosion.
Position splash blocks so they slope away from the house, directing water at least several feet from the foundation for maximum protection.
Drawing Up the Framework

Source: Pixabay - Pexels
There’s a world of difference between a cathedral and a monoslope roof frame. And, as long as you’re not trying to build a dome-like or octagonal roof frame, but more of a one- to two-sided structure, you’ll be good to proceed on your own, given that you’ve amassed the basic, necessary knowledge and skill set.
After having looked over the basic elements that make up the frame, you’ll have gathered that your roof is made up of a “truss,” which is basically the triangular webbing. So, what’s important to know from the get-go is the angle at which you want your roof to pitch.
How to Determine the Roof’s Pitch
The roof’s angle, also known as the roof’s pitch, is determined quite easily with this calculator, and that’s in the unit of measurement of your choice (metres or inches, degree or radian).
Measured in inches, the minimum pitch must be 4:12. That way, the roof’s slope will be 33.3%. A less notable roof slope, devoid of a waterproof covering (adapted for flat roofs), will lead to water infiltration caused by wind-blown rain beneath the shingles.
Nonetheless, the roof’s pitch becomes evidently important in a country like Canada, meaning one in which there are heavy snowfalls and lots of ice. As a matter of fact, the more a roof is sloped, the less snow build-up there will be, which in turn limits the risks of the roof collapsing.
Therefore, a conventional roof will have a 9:12 slope, or a 75% pitch. Now that you’ve made up your mind as to your future roof’s angle, all that’s left to do is determined whether or not you want to create an opening for a skylight (Velux).
Cutting Out a Section of the Frame
Source: Canva
By definition, creating an opening in the frame will result in the weakening of the structure. To remedy this, you’ll need to consider where you’ll set your joists (in other words: your beams) that’ll reinforce the frame left with a void which will end up being your window, which is known as a trimmer beam/joist.
The joists will end up supporting the severed rafters to create the required opening to fit the window. Their width will ultimately depend on the weight that these will need to support.
Simple, straightforward openings are created by cutting a maximum of three rafters. Beyond that, the openings will need to be calculated by an engineer, who’ll be able to determine the underpinnings required, especially when it comes time to implement the dormer.
Roof Structure Installation
Typically, you won’t be the one heading out to purchase your beams and building trusses. These are pre-assembled in a factory, according to your plans, and will later be reassembled on-site.
If you plan on making your own trusses, make sure that they’re all identical. Otherwise, neither your roof nor ceiling will be level. You’ll then have issues when laying your roof shingles and your interior gypsum ceiling panels.
Step 1: Mark the location of the trusses on the wall plate. The trusses are fitted every 24 inches (60.94cm) on the wall plates. So, mark your wall plates with these measurements.
Step 2: Install the starter trusses and gables. In your yard, build the two missing trusses on each end of your roof, then add the gables. Some manufacturers provide temporary braces to better stabilize the trusses.
Step 3: Add pieces of wood to the trusses to then fit the fascia. Fascias are beams that will determine your roof’s pitch. It’s a rather aesthetic element to the structure, yet it also does support your structure’s last rafter. The pieces of wood to be added to every truss should be 2” x 4” or 2” x 6”.
Step 4: Remove the roof trusses by stabilizing them with temporary braces. The braces are 2” x 6” planks that support the roof trusses up until the entirety of the trusses are installed. Lifting the roof trusses must be done with a crane. At this point, the roof trusses will be secured to the three eaves purlin. This procedure will require the involvement of three people, on top of a crane operator: two people will need to secure the trusses to the purlins (one per slope), and one person will need to steer the trusses with a rope.
Step 5: Mount the roof trusses to the frame of a load-bearing wall. Using a crane, position the frame on the load-bearing walls and secure the first roof truss.
Step 6: Attach the furring strips. Furring strips are 1 x 3 x 25½ studs which hold the trusses together.
Step 7: Fasten the fascias on the edges of the roof.
Step 8: Finish the frame by securing the roof diaphragm.
The diaphragm is a structural element that supports horizontal loads (torsion, shear). To build one, you can use 4 x 8 plywood or OSB panels nailed together to the decking.
Horizontal stability is also enhanced by installing the floor of a house. As a matter of fact, it contributes to the horizontal force transmission of the load-bearing walls and then to the foundations.
Do you have a framing renovation project coming up? Check out our House Framing Handy Reference Guide to Success.
Frequently Asked Questions About Roof Parts
Can I repair or replace individual roof parts?
Yes, many parts like shingles, flashing, or gutters can be repaired or replaced separately. Structural parts such as rafters or trusses usually require professional attention.
Which roof parts need the most regular maintenance?
Shingles, flashing, gutters, and soffits should be checked often, as they are most exposed to weather and damage.
What happens if one roof part fails?
A single failed part can lead to leaks or further damage, since all roof parts work together to protect your home.
Should I repair roof parts myself or hire a professional?
Small tasks like replacing shingles or cleaning gutters can be DIY. Structural repairs should always be left to professionals.
Why should I know about different roof parts?
Understanding roof parts helps you spot issues early and communicate better with contractors.
Looking for something else?
Related articles
The latest industry news, interviews, technologies, and resources.

Editorial Team
•04 Nov 2025
Is a well-maintained roof really that essential? The answer is yes—it ensures your building’s protection, energy performance, and value. How can you avoid water infiltration or damage caused by frost and sun? What habits can help extend the life of your roof? Exposed to the elements all year long, your roof requires regular maintenance. This guide walks you through the best practices to follow throughout the year.

Cynthia Pigeon
•21 Apr 2026
It is no secret that a leaky roof can have severe budgetary repercussions: moisture problems, heat loss, and property damage.

Équipe éditoriale
•08 Nov 2023
Note: this article will evolve as we get new recommendations from government authorities. Please note that the information you are reading now could be different tomorrow. The advice presented in this article should be interpreted as a suggestion.

Amanda Harvey
•27 Jun 2024
Installing a brand-new toilet in your bathroom isn’t exactly a desirable project. Plumbing aside, this isn’t a job for the faint at heart and takes some time, effort and heavy lifting. However, if you’ve got a spirit for adventure and you’re feeling up for it, this is a DIY job that you can easily take on!

Léa Plourde-Archer
•08 Nov 2023
The roof is an element of the home that requires special attention. Roof renovation projects can vary drastically in price and span, from weatherproofing to a complete reconstruction. The budget that is allotted for these projects can be minimal, but it may also reach several tens of thousands of dollars.