Submit our quick form and get quotes now!
7 min read
By: Léa Plourde-Archer
7 min read
By: Léa Plourde-Archer
Renovation guidePlumbingRenovate your bathroom from the plumbing to the floors!
Are you thinking about renovating your bathroom? This process can be long and complicated, as it involves several steps, as well as a number of factors that can affect the price, the duration of the work and the durability of the materials.
This type of project requires proper planning. Even when hiring a contractor to complete the work, it is recommended to be informed about this subject, in order to get a better idea of what one wants and what one must plan.
Having written several articles about bathroom renovation projects, we decided to compile and classify the links to these articles in one place to make it easier to find important information about several aspects of this type of project.
We also suggest that you check out our checklist for bathroom renovation projects, as this article contains a ton of information and comes with a document you can use to organize your project.
What budget should you set aside for a bathroom renovation project? Of course, each case is different, but to get a ballpark idea, here are a few articles that cite average prices for bathroom renovation projects:
Do you wish to know how much your renovation will cost? Try our cost estimator!
The bathroom floor is exposed to a lot of water, which means that the material used as flooring must be adapted for this room.
It is important to use the proper type of product to paint the bathroom. Paints that are used in other rooms (except the kitchen) are not always suitable, since they are not as resistant to water and grime.
Source: Unsplash
Bathroom sinks are practical and decorative elements that are one of the main elements of the room. Each bathroom being different, it is important to find a sink that fits within the space that is available. Fortunately, several models are available:
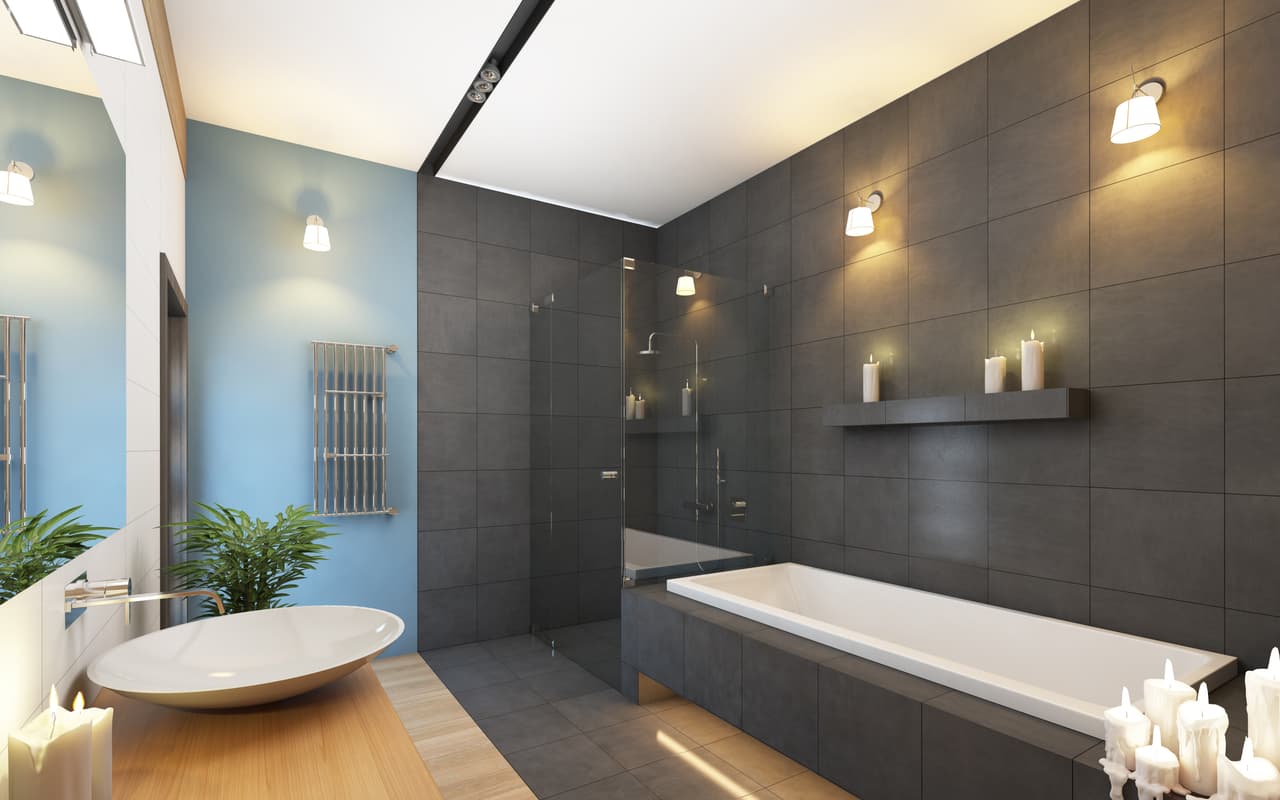
Planning to renovate your bathroom?
Fill out the form so that we can put you in contact with certified contractors from our network!
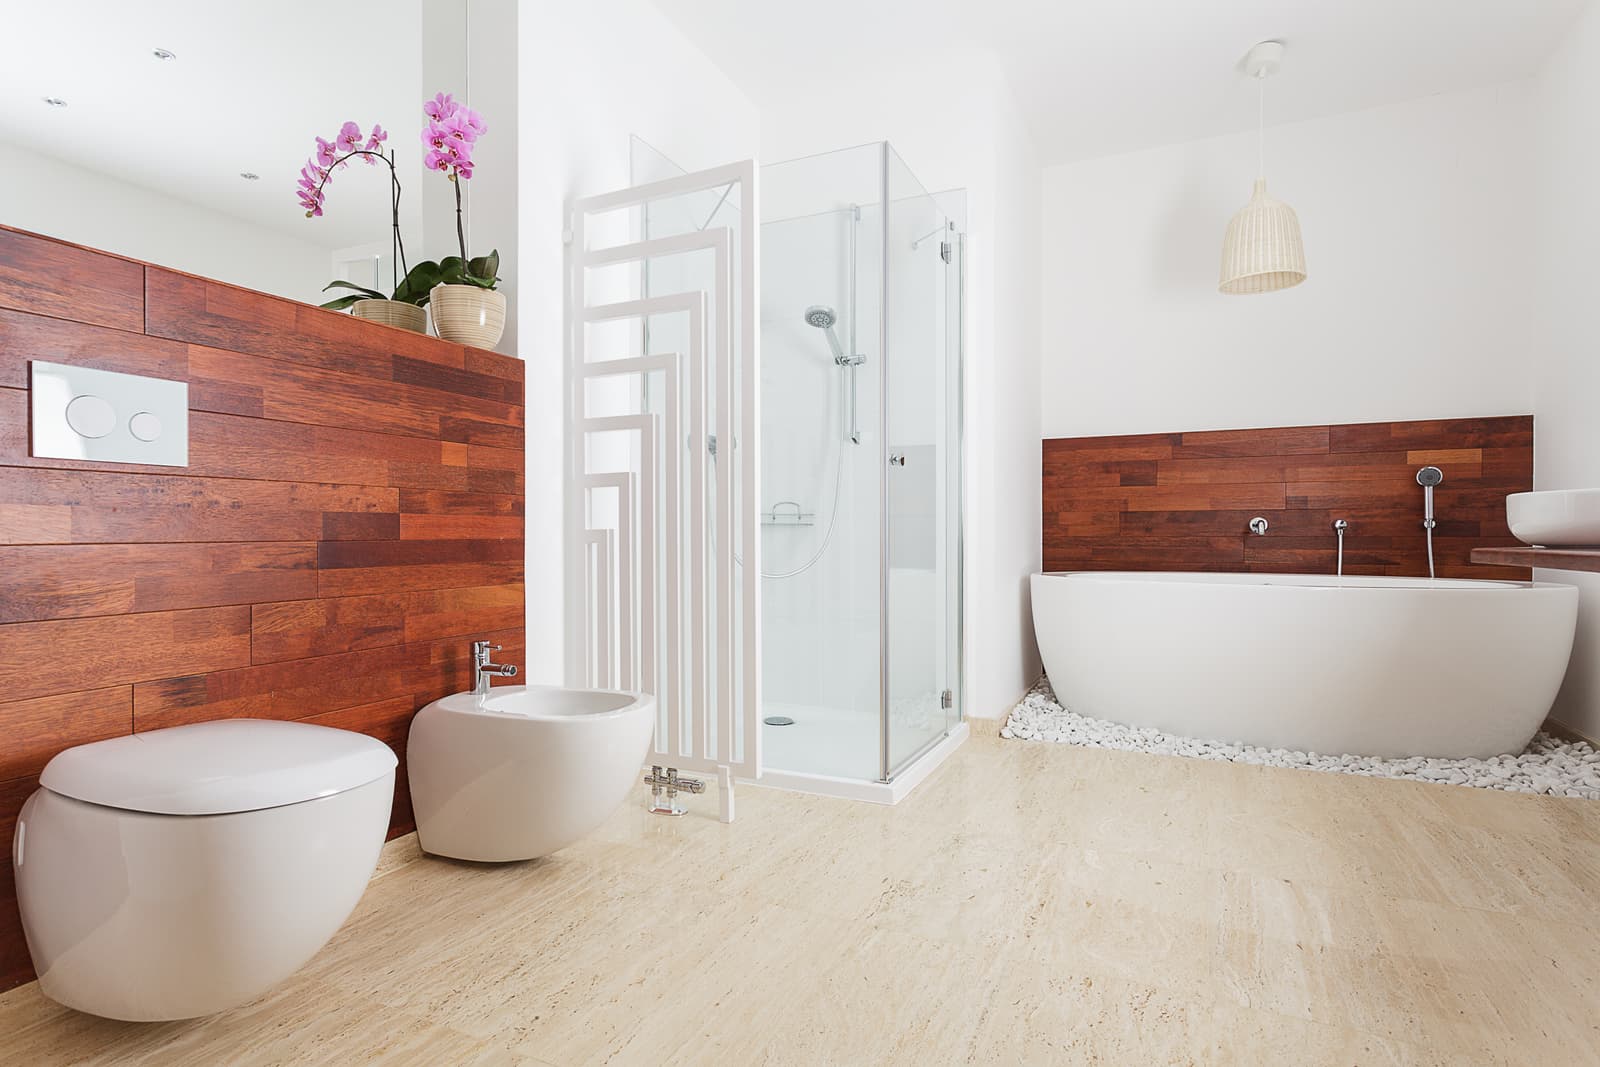
Bathtubs and showers are central elements in a room that is dedicated to personal hygiene. Due to the sheer number of options, here are a few tips that will help you find the model that best suits you:
*Articles about kitchen countertops, but that also applies to bathrooms
Even though they are not as sizeable, bathroom countertops must be able to resist certain elements, such as water and dirt.
Renovating a bathroom is often a mid or large-scale project. It is therefore important to plan the work in order to ensure that everything goes along as planned.
Source: Unsplash
Each person will decorate their bathroom according to their taste, but here are a few tips that focus on current trends:
It is very important for the bathroom to be well-lit, particularly if it features mirrors.
Materials that are used in bathroom renovations must be able to resist the elements to which they are exposed, such as mould, water and dirt.
Of course, plumbing is one of the main components of a bathroom and therefore, it must be one of the first things that is thought of when organizing a bathroom renovation project.
Source: Unsplash
Ah, the toilet! A throne in one's home, though little value is placed on this fixture. Evaluate the different models and learn more about how to install a toilet:
It is very important to make sure that the bathroom is well ventilated. This room accumulates a lot of humidity, which can lead to the appearance of mould. However, if the bathroom is properly ventilated, this type of problem will not occur.
To see examples of bathroom renovation projects completed by RenoQuotes.com contractors, check out 10 examples of beautiful bathroom renovation projects.
RenoQuotes.com will put you in contact with 3 reliable contractors for your bathroom renovation project. Fill in the form on our homepage (it only takes a few minutes), and you will receive quotes from trusted professionals.
Last modified 2023-01-27
We’ll be emailing you the latest market price guide for renovations.
The latest industry news, interviews, technologies, and resources.
Karine Dutemple • 30 Aug 2019
Regardless if it’s large or small, almost every renovation project is going to involve careful planning, close attention to detail, patience and perseverance. For the novice builder among us, you may not understand what each stage of a building project entails. If you’re hoping to take on a frame alteration, a renovation or a completely new build, there are some aspects you’ll need to consider. Regardless of the size or scope of your renovation project, there are certain stages that will almost always be necessary to follow. We’re going to lay those out for you below, as well as offering some tips that will make things run as smoothly as possible. Here are the stages of the building process 1- Planning out the renovation project source: unsplash The planning stage of a building project is one where careful and considerate targets and goals need to be drawn up. Getting your ideas in order before diving headfirst into a renovation will make your end result much more achievable. If you’re taking away anything from this article, it’s that it is crucial for you to be realistic. Consider all aspects of your project and these include priorities, budget and time. One major factor often overlooked in a renovation project is the position of your building as well as the location of your land. Think about these factors in relation to the trajectory of your renovation: Weather: the direction of the sun & wind; Water, electricity, and plumbing; Property boundaries; Neighbours; Site access; Hills, slopes or uneven land; Existing features you’ll be retaining such as trees. Another consideration will depend on how rural the area where you’re building is. Will it be necessary for you to install a septic tank? What about an emergency water supply? If you’re unable to determine these things on your own, then look into speaking with the building or property council in your municipality. They should be able to provide site-specific reports that will help the planning and design stages play out in the smoothest possible fashion. These are only the initial planning elements in a building project. Planning a renovation project? Fill out the form so that we can put you in contact with certified contractors from our network 2- Designing elements and hiring a team of contractors source: unsplash In some cases, renovating a building that is already in place will actually be more complicated than starting a completely new project. If you happen to be starting from scratch and you’re not a trained builder, designer or architect; you’re going to need to hire one of the three and potentially as many as two of them. When it comes to the design of your renovation project, you’ll need to brief anyone you’ve hired about the design elements, the overall budget, and additional details. Be clear about how much you’re able to spend and survey these aspects carefully: How will you use the space? What do you want it to look like when complete? What materials do you plan on using? Will there be enough natural light? These questions will need to be determined before any building or permit plans are submitted to your municipal council. Although it’s natural for some things to change over the course of a renovation project or building development, large-scale changes could mean additional costs from your municipality. As mentioned, it’s likely you’re going to be hiring someone or a team of people to help you complete your renovation. Confirm a project manager, if you haven’t already appointed yourself. You’ll need this information for the building and permit plans, which we’ll get into in our next section. Working out how active of a role you have will be necessary, and delegate all other tasks to the project manager or main contractor you’ve chosen to hire. Be sure to ask for detailed quotes from the contractor or company you intend on employing as well as addressing the specific timeframe the project will take. Before setting your sites on one person to work with, we’d suggest comparing quotes from a few companies or contractors. Ensure that these quotes include building elements, materials, fixtures, and finishes. Be certain that the person or team you end up hiring sign a contract which indicates the work and completion deadlines they’ve agreed to as well as payment schedule. Not only this, make sure that you actually have the budget you’ve allotted to this project before any work begins. Your contractor, architect and everyone else working on this project deserve to be paid on time. 3- Getting all the building permits Permits are essential for any building or renovation project. In most cities, permits will need to be applied for at the municipal level. Permit applications will often require detailed drawings which lay out exactly where and how the building project will happen. If you’re working with an architect, it’s likely they’ll take the initiative on building permit drawings. Do careful research when it comes to applying for permits, as any missteps could completely halt your project until you have access to the right paperwork. 4- Carrying out the work source: unsplash Once you’ve hired a team and all permits are in your possession, then you can move forward with building. As soon as you know the date you’ll be starting, you need to inform your building council or municipality. This date will be important, as the project you take on will have to be finished in a designated time period. Keep in constant dialogue with your project manager, contractor or architect so that you can monitor progress, this may include organizing inspections of the building site. If you find the work is not progressing as quickly as you thought it might, discuss this with the contracting team and determine new dates and deadlines. This information will need to find its way back to your municipality, especially missed deadlines. Collect any certificates for energy and gas work, and remember that installing gas lines, plumbing or new wiring will require the assistance of an expert in their respective field. Be on top of all payments that were previously agreed upon. Budgeting for a large renovation project can be one of the most difficult tasks, especially because in most cases unseen expenses will come into play. Here’s an article that carefully lays out a realistic way to plan a renovation project budget.
Léa Plourde-Archer • 04 Jan 2018
Insulation is one of the key elements in terms of the level of comfort inside a home. This statement is even more true in a country where winters are harsh and summers are very hot. Indeed, even during the summer, insulation plays a major role because if the walls and other elements are poorly insulated, hot air will pass and energy expenses will be increased. As far as soundproofing is concerned, this is a very important aspect in relation to the quality of life of the home's occupants. They want to have their privacy, while being able to participate in activities that make noise, without disturbing others. It is also necessary that the house be well-soundproofed with regards to noises coming from outdoors. RenoQuotes.com has many insulation and soundproofing experts in our network. We have also published many articles on this topic on our renovation blog. To make things easier for you, we have collected and classified the articles in this guide about insulation and soundproofing: General articles about insulation Here is a list of articles that touch on many aspects of insulation, including the different types of insulation, the average prices of materials available on the market, and environmental concerns. You will also find clues to help you determine if your home is badly insulated and learn what to do in this type of situation. Everything you need to know about home insulation The cost of insulation 3 eco-friendly insulation materials The top signs of a poor home insulation Photo: Dunktanktechnician Different insulation materials There is a wide variety of insulation materials for which prices and quality levels differ widely. Before choosing the right material, it is important to evaluate the options available in order to find out what will work best in your home and suit your budget: Mineral insulation materials Natural insulation materials: what you need to know Everything you need to know about synthetic insulation Looking for a pro who can improve your home's insulation and soundproofing ? Fill out the form so that we can put you in contact with certified contractors from our network Insulation techniques and parts of the house that need insulation Each part of the house needs to be well insulated. On the other hand, certain sections are more important than others. Think of roofs, walls, basements and attics, among others. If these sections are poorly insulated, the rest of the house could suffer the consequences. Here are some articles that specifically address the techniques and parts of the house not to be overlooked: How to insulate a roof and an attic How to insulate a crawl space: tips and guidelines How to insulate an attic: materials and techniques 6 signs that your attic is not well insulated Soundproofing techniques and materials As previously stated, soundproofing is another very important factor in ensuring that occupants of the home are comfortable. Sometimes, small changes will work to improve the soundproofing, while in other cases, the transformation must be more extensive. 10 ways to soundproof your home How to soundproof a basement Everything you need to know about soundproofing Photo: Air Mobility Command Other materials that can contribute to insulation and soundproofing in the house In addition to insulation and soundproofing materials, other materials such as air and vapour barrier membranes can greatly help ensure that the house is in good condition. Here is an article that talks about vapour barriers: What is a vapour barrier? Potential problems In the past, certain insulation materials contained products that are now banned or whose use is heavily regulated, including asbestos. Here is an article that discusses the dangers of this element and techniques for removing asbestos-containing materials: How to recognize lead and asbestos in your home Tax credits for insulation and soundproofing projects Since proper insulation helps to make the home more energy efficient, many tax credits and subsidies are available through various levels of government. These programs often change but here is a presentation of several credits and subsidies currently available: Subsidies and tax credits for renovations in Alberta Subsidies and tax credits for renovations in Ontario Toronto green renovation initiatives Other relevant articles Here are a few other articles that talk about insulation, among other things: Passive house: everything you need to know about this concept! 10 ways to improve your home's energy efficiency Five essential ways to weatherproof your home 10 green home renovation materials Building an ecological home: 6 things to know Cover photo: Flickr Martin Pettitt
Cynthia Laferrière • 07 Apr 2022
Are you looking to add hardwood floors in the common areas of your house hoping to create a rustic feel? Cherry wood flooring, although not the cheapest option, has an exotic essence and makes for a durable choice due to its sustainable material. Installing such hardwood floors is a long-term investment and will be most beneficial in areas with the most foot traffic, such as hallways, the living room, and the kitchen. It goes without saying, but this type of wood, although sturdy, is not indestructible; years of wear, natural light, and pets will wreak havoc on your floors. However, there are ways to prolong its durability by having your floors installed properly and by following a scrupulous maintenance schedule. Cherry flooring installation First off, it is paramount that you follow the instructions provided by the manufacturer when installing your brand new floor. The instructions can seem rather complex and difficult to understand if you are not well versed in the subject. However, if you are not comfortable with the instructions, note that many manufacturers offer skilled labour. Photo: Flickr Looking for specialists for your flooring renovation project? Fill out the form so that we can put you in contact with certified contractors from our network! Useful tips Prior to starting, make sure that all other work in the vicinity (plaster, concrete, paint) is completed to avoid high levels of humidity in the room. Ideally, the room temperature should be around 20 degrees and the humidity level between 40% and 50%. Allow 48 hours for the cherry wood boards to acclimate to the room in which they will be installed. Have the necessary tools handy: Measuring tape; Crowbar; Hammer; Carpenter’s square; Hardwood flooring stapler; Saw; Drill; Nail punch; Flooring and finishing nails; Touch-up pen; Chalk and chalk lines; Protection goggles; Knee pads; Broom or vacuum. Next, make sure your subfloor is level and clean. Install ¾ inch spacers along the walls and, if needed, trim the bottom of your door frames the same size as the joint. Do not worry, the baseboards or mouldings will cover it up and you can always adjust the frames at the end. Depending on the thickness of your floor and the manufacturer’s instructions regarding the required distance, with the help of chalk and chalk lines, draw a line parallel to your starting wall at a right angle to the adjacent wall. When installing the first two rows of boards, use the straightest planks available. That way, the hardwood planks that have any imperfections can be installed in areas that are out of sight, like a wardrobe, where they can be resized to remove all imperfections. Next step: fixing the planks to the ground. Lay down the first row by drilling holes an inch from the wall and leaving 12 inches in between every hole. Nail and conceal with a touch-up pen. Then, install the next few rows with a hardwood staple gun, and finish the last three rows with nails. Once completed, position your baseboards, quarter round mouldings, and door sweeps by nailing them to the wall, not the floor. Throughout the process, keep an eye on the underside of your staple gun; ensuring its condition will prevent any damage to your planks. Take it one step further and test the staple gun on a discarded piece of plank to familiarize yourself with the tool and the required pressure to apply. Also, ensure that your drill bits are smaller in diameter than your finishing nails. Always leave a quarter-inch space between the wall and the end board. Start your rows with boards of various lengths so as to not have even board ends from one row to the next; the goal is to have alternative joints. Photo: Pexels Systematic maintenance of cherry wood floors First, to remove dust, we recommend using a microfibre towel or pad. A broom will only move the dust around. On the other hand, a microfibre pad will trap the dust with its electrostatic material. A vacuum’s wheels and/or brush head can damage your floor. Next, it is imperative that you use a hardwood floor cleaner but never pour it directly on the floor. Useless to say, since water and humidity are the nemeses of hardwood floors, using a steam cleaner or too much water is inadvisable. Furthermore, vinegar and wax-, oil-based soaps will leave behind a residue or will gnaw away at your floor. Damages to the surface on your floor will accumulate faster than expected and that does not pay off! Other daily tips to consider: In case of a liquid spill, clean it up right away before the liquid has any chance of being absorbed by the wood fibres. Place floormats/carpets in at-risk areas, such as the entryway, where gravel and dirt tend to accumulate and scratch the floor, and in front of a work desk and underneath a chair with rollers. Furthermore, to avoid scratches, stick felt pads at the bottom of your furniture and move your furniture with the help of a rug or carpet. Also, it is worth knowing the maximum live and dead loads that can be applied to your floors. Get additional information in the joist table. Cherry hardwood floors: long-term maintenance Have you been diligently maintaining your hardwood floors, but they still need a little zhooshing? There are several solutions to help you out. Option #1: Oils. You can sand your hardwood floors before applying a coating of oil that will act as a protective layer, which will improve water resistance and give it its former shine. Carefully read the instructions, as well as any guidelines, since certain natural oils can take up to a week to dry completely. Unlike flaxseed oil, which is not recommended in humid spaces or for outside use, nut oils have no risk of rotting and offer a matte finish. Option #2: Touch-up kit. Ask a qualified employee before purchasing any product to ensure its adequacy. Option #3: Return to its former state of glory. Ideally, you will want to hire woodworking professionals who will sand the wood before applying a new floor sealant and finish. Looking for a cost estimate for your flooring project? Try our cost calculator! Photo: Flickr Now that you are well-informed and equipped for your flooring project, you can get started!
Léa Plourde-Archer • 20 Oct 2020
Brick is a building material that's been used for hundreds, if not thousands, of years. In terms of sustainability, it has proven its worth. It is a very clever system used for structures and exterior cladding. Brick is made to withstand different climates and is suited to both modern aesthetics and more classic looks. In other words, basic brick work has a very long service life, spanning decades and even more! However, there comes a time when the mortar joint that acts as a sealer between the bricks has to be repaired or replaced with new mortar. Several factors come into play here, and in this article, we will highlight the main causes of brick joint problems, the experts to hire to remedy such issues, and the approximate cost to budget for new mortar. What causes brick mortar issues? First, know that mortar brick joint problems are one of the 6 most common issues with masonry. The main causes of mortar issues are as follows: Use of poor quality mortar or the wrong type of mortar; Weather conditions can affect the integrity of the product; Incorrect product application (too much or not enough); Lack of water drainage can cause other problems like bulging brick walls; Other problems that lead to cracks in bricks and mortar (to be determined with the mason). Before we delve into the telltale signs of mortar issues and total project costs, let's take a look at the difference between brick repointing and tuckpointing, which can be confusing. Is it wise to wait a bit before having the mortar repaired? Ideally, it is best to act as quickly as possible when you notice that the brick mortar joints on an exterior wall are damaged. Indeed, if what is commonly referred to as the bricks' seals are not in good condition, you run the risk of aggravating the situation. Eventually, it will no longer be a repointing job, but a bulging brick wall repair project caused by water leaks, cracks, structural problems, and so on. Moreover, if there are holes between your bricks, it's like opening a door for critters! Your exterior walls will no longer be as impermeable for water, but also for insects and other critters that we prefer to keep outside. Therefore, if you notice that some joints are in need of repair, it is best to at least have them evaluated by an expert. They can tell you if you need to carry out the repairs as soon as possible or if it can wait a few months. Repointing vs tuckpointing: What's the difference and which is cheaper? Brick repointing and tuckpointing are both methods that are commonly used to repair or restore brickwork mortar joints. However, the two differ in their techniques and, ultimately, the objective of the repair. Meaning, the costs are rather competitive and shopping around for the right professional for the job is worthwhile. Note that some companies may offer free estimates. When repointing brickwork, said task involves removing the damaged or deteriorating mortar from between the bricks and replacing it with fresh, new mortar. As such, the brickwork will be strengthened, thus making the structural aspect of the chimney, cladding, retaining wall, whatever it may be, more structurally sound, durable, and let's face it, more beautiful! The reason why repointing is a home, chimney crown, or older bricks is that the new mortar will act as a brand-new seal, thereby preventing structural damage down the line. As for brick tuckpointing, this is a rather more complex, specialized technique, one that isn't always used to repair structural damage, but rather for aesthetic purposes. And, since homeowners will mainly employ said technique to enhance the beauty of a brick wall or other, costs are steeper than repointing. Tuckpointing is the action of creating what appears to be thinner and neater mortar brick joints. Basically, this means that two types of mortars will be used: one with a colour that is very similar to that of the bricks, and a second one that's layered using a narrow pointing trowel. By using two different colours of mortar, the final result gives off the effect of fine joint lines, rather than thick mortar between the brickwork. It goes without saying but, the latter is a more time-consuming and expensive process, while the former is very much used to repair deteriorating mortar joints. Oftentimes, aside from labour costs, material costs significantly increase the overall price. Are you looking for experts for your masonry project? Fill in this form to be connected with top-rated contractors! What type of expert should you hire to point brick work? For projects involving brickwork, always call in masonry experts! If you reside in Quebec, make sure the contractor you are dealing with has the right RBQ licence, with the relevant subclasses, including a 4.1 licence (masonry structures contractor). As for other provinces, check with your local authorities to know what type of licence the professionals will need to operate legally. If you use the services of RenoQuotes.com, know that for all our network contractors, licences have been verified to ensure they are indeed valid. Masonry is an expertise in itself. You have to know the techniques to employ and the products to use in order to make the best choices so that the result is durable and safe. Therefore, for a mortar joint project, it is often better to entrust the task to a specialist rather than a contractor with less experience in the matter. Also, high-quality results are further guaranteed that way. In a previous article, we detailed the stages for repairing brick joints. If you want to get an idea of what this is all about, feel free to peruse our article prior to reaching out to contractors! How much does it cost to repoint a brick wall in Canada? At last, the long-awaited question that most likely drew you to this article! We consulted several masonry experts who are part of our network and they stated that this type of project entails costs ranging between $14 and $20 per square foot. To get a general idea of the costs involved, you can try measuring the area in question and multiplying accordingly. Check out our article Price Guide: Masonry Work and Bricklaying to learn more about the average cost for other work. How often should a brick wall or chimney be repointed? As you've probably noticed, this article, first and foremost, addresses brick work located outside of a home. Obviously, indoor brick wall joints also need to be repointed. This is especially true if the brick wall is located in a humidity-prone area such as a bathroom or kitchen. In a living room or bedroom, repointing can be less immediate, but you should still seek the advice of an expert because it is impossible to assess all this without being knowledgeable on the subject and you should especially not trust some vague telltale signs that you may have heard somewhere and then base your diagnosis on it.
Christime Simard • 06 Nov 2019
Even though you consider your home to be synonymous with protection and shelter, severe storms can sometimes cause severe problems. Whether it's the fault of winds, heavy rain or thunderstorms, your roof is not immune to unforeseen damage. Other well-known scenarios also include snowmelt, shingle loss and water infiltration caused by bad weather. However, with a little TLC, last-minute disasters can be easily avoided. This is why, before starting any work, other questions could run through your mind: "Do I need to redo my entire roof? Is it still good for a few more years?" Here are some tips that might help you figure out the right decision: repairing or replacing? Repairing or replacing: everything you need to know about your roof Evaluating the condition of your roof Before anything, it is good to know the estimated age of your roof. You will need to consider this aspect in relation to its material (metal, shingles, membrane, etc.) and the year of its installation. According to ToiturePro, "the companies offer a guarantee on the material related to this life expectancy as well as a 5 to 10 years guarantee on the work". If the life expectancy of your roof is unknown to you, it is therefore important to proceed with its assessment. It is possible to do this yourself, making sure to do the full perimeter of the roof and take into account as many details as possible: ventilation, the soffits, the flashings and the fascias. Check to see if your shingles are peeling, curling, or missing at some spots. It is best to do this inspection at least twice a year. Looking for specialists for your roof renovation project? Fill out the form so that we can put you in contact with certified contractors from our network! The interior of your home: a good indicator The external appearance of your roof is not the only factor to be taken into account when it comes to the roof. High humidity, swelling paint, mould and seeping water could all be directly related to your ageing roof. Going to the attic to check the frame will give you a better idea of the condition of your roof. If it is wet, take action quickly. Finally: replacing or repairing your roof? If your roof is only a few years old, it would be best to contact the company you dealt with if you have any problems with it. They will be able to fix any issues and ensure that it is solid for years to come. However, if this is not your first repair and your roof never seems to give you a break, you might want to consider a full repair. If you put off work constantly, you could end up with more damage to your home. To learn more, read our article What happens if you don't renovate your roof? Finally, if during the inspection you have noticed significant damage on a specific part of the roof, but it still seems very solid to you, a repair for that specific area may be possible. It is always better to call a professional in this situation. Would you like to continue reading on this subject? Check out our articles: Roof Renovation Guide: Checklist of Steps to Follow Renovation Guide: Fixing Your Roof Do you want an estimation of the cost of your next roof renovation project? Check out our cost calculator!